The new owners will be buying much (I hope!) of the furniture, and also some of the decor.
Once they’ve decided what they want, I’ll be selling the rest, and taking with me only the things with memories attached, or things I love that can’t be replaced.
So this post will be short and sweet – below are links to photos of my house showing how I decorated it, using all of the things I’ve made over the last couple of years.
If you have any questions, please feel free to ask, and for those of you in Mauritius, once I’ve priced all the items that will be for sale, I’ll post details of either a garage sale/vide grenier, or on how to get in touch with me.
Indoor plants have been trending in the interior designer world for the last few years – with specific plants even becoming the “must-have” decor item.
For example, the hugely expensive fiddle leaf fig (which apparently dies if you don’t tell it you love it every day!).
Or the current darling of whoever sets these trends, the olive tree.
What the actual (insert your favourite swearword here)!
Olive trees thrive in the ground in a Mediterranean climate – not in a pot in your lounge room! Expect your hugely expensive decor accessory to start dropping leaves in protest, and then shrivel up and die, while silently screaming abuse at you.
Unless you go the fake plant route.
Don’t even get me started – I’ll never stop.
Who cares – here we go…
…if you have a spot in the house where a plant cannot survive (no light, too high for watering etc), AND they don’t look blatantly fake, then they’re perfect – I have a few myself:
But otherwise, come on! Stop filling your house with plastic that looks like plastic!
If you choose correctly, all you have to do is water your real plants once a week or so, and they’ll flourish.
Having said that, the last time I owned a houseplant was in the late seventies/early eighties when I discovered that no matter what I tried, I was a menace to all plant life.
At the start of my current attempt at being a plant owner, I did a little time-travel back to those days, and made the same mistakes – I went to the indoor plant section of nurseries, and bought expensive plants that were used to being carefully looked after.
Needless to say – they ALL died.
Well, they didn’t just die – history repeated itself, and I killed them through the two extremes of neglect and overwatering.
But this time I didn’t give up, and what I eventually did instead, was to dig up plants from my no-maintenance garden and bring them inside.
And they are thriving!
I water them once a week – or sometimes fortnight if I forget – or sooner if I notice any of them drooping – and that is it.
In the three or so years I’ve had them, I haven’t had a single loss. And I am a terribly negligent plant owner (that’s also why I have a cat and not a dog – low-maintenance, but loving pets – if you don’t have a cat, you don’t know what you’re missing – they are lovely!)
And what a huge difference plants make to the feel of my house.
I’m so grateful to the interior designer who initiated this trend – the memory of all my dead seventies plants has finally been relegated to the cobwebbed corners of my mind.
Anyway, on that cheerful note, here are some with and without shots to hopefully encourage you to fill your home with green (not plastic please!).
PS You also get to decorate with beautiful baskets and planters, as well as DIY stakes.
I have a superpower, and it’s the ability to get hopelessly lost whenever I’m in Port Louis.
And this is despite the fact that I walk around, phone-in-hand, following Google Maps like a first-time tourist, instead of striding confidently to my destination the way that someone who’s lived here for 14 years should be able to do!
Usually it makes me curse my woeful sense of direction, but every now and then, getting lost pays off, and I stumble across a hidden gem of a shop.
Annoyingly, I almost always forget to take note of where it was, and never find it again.
Like the little Chinese shop I found last year which sells raffia in bulk, as well as a million other things that are all crammed into a small dimly-lit space that looks more like a hoarder’s shed than a shop.
But whilst shopping in Port Louis last week, I took a wrong turn and ended up right in front of it again! Even more amazing is that I recognised it from the outside, as due to Covid safety precautions, customers aren’t allowed into the tight space – hence the chain across the doorway…
In case you’re interested, it’s on Queen St, near number 23 (I think it’s near the corner of Corderie St, but don’t quote me on that!). And now that I think about it, Li Sing Kok may not be the name of the shop, but of the one next door.
Are you beginning to understand how it is that I always get lost?
Anyway…
The raffia is pre-bundled, and sold by weight.
My new bundle was just over 2lbs:
And this is all that remains of my first bundle which was even bigger:
So take a wild guess at what you’re about to see!
Most of these projects involve attaching lengths of raffia to a piece of string, or to a metal or wooden ring, using the larks head knot – always do it while watching tv or chatting to a friend, or the tediousness of it will drive you crazy!
Mirror
Buy it:
Etsy USD90
Zanui AUD150
Or make it:
I already had a mirror glued to MDF so I simply hot-glued my strung raffia to the edge, then added a row of jute cord to hide the small gap that was left.
FeatherED HANGING
A company called Timber and Torch were selling these wall hangings a couple of years ago , so I decided to make something similar:
Buy it for USD178:
Or make it:
I made two strings of larks head knots, adding wooden and air dry clay beads to the smaller one.
I tied them to small hooks screwed into the bottom of a piece of pine which I’d stained dark brown, and added some gold foil to.
I then wrapped the shafts of feathers with raffia, and tied them on.
I tied another one to a guava branch, adding air dry clay beads and more feathers:
This video shows you the basics, which you can then customise to make your own version:
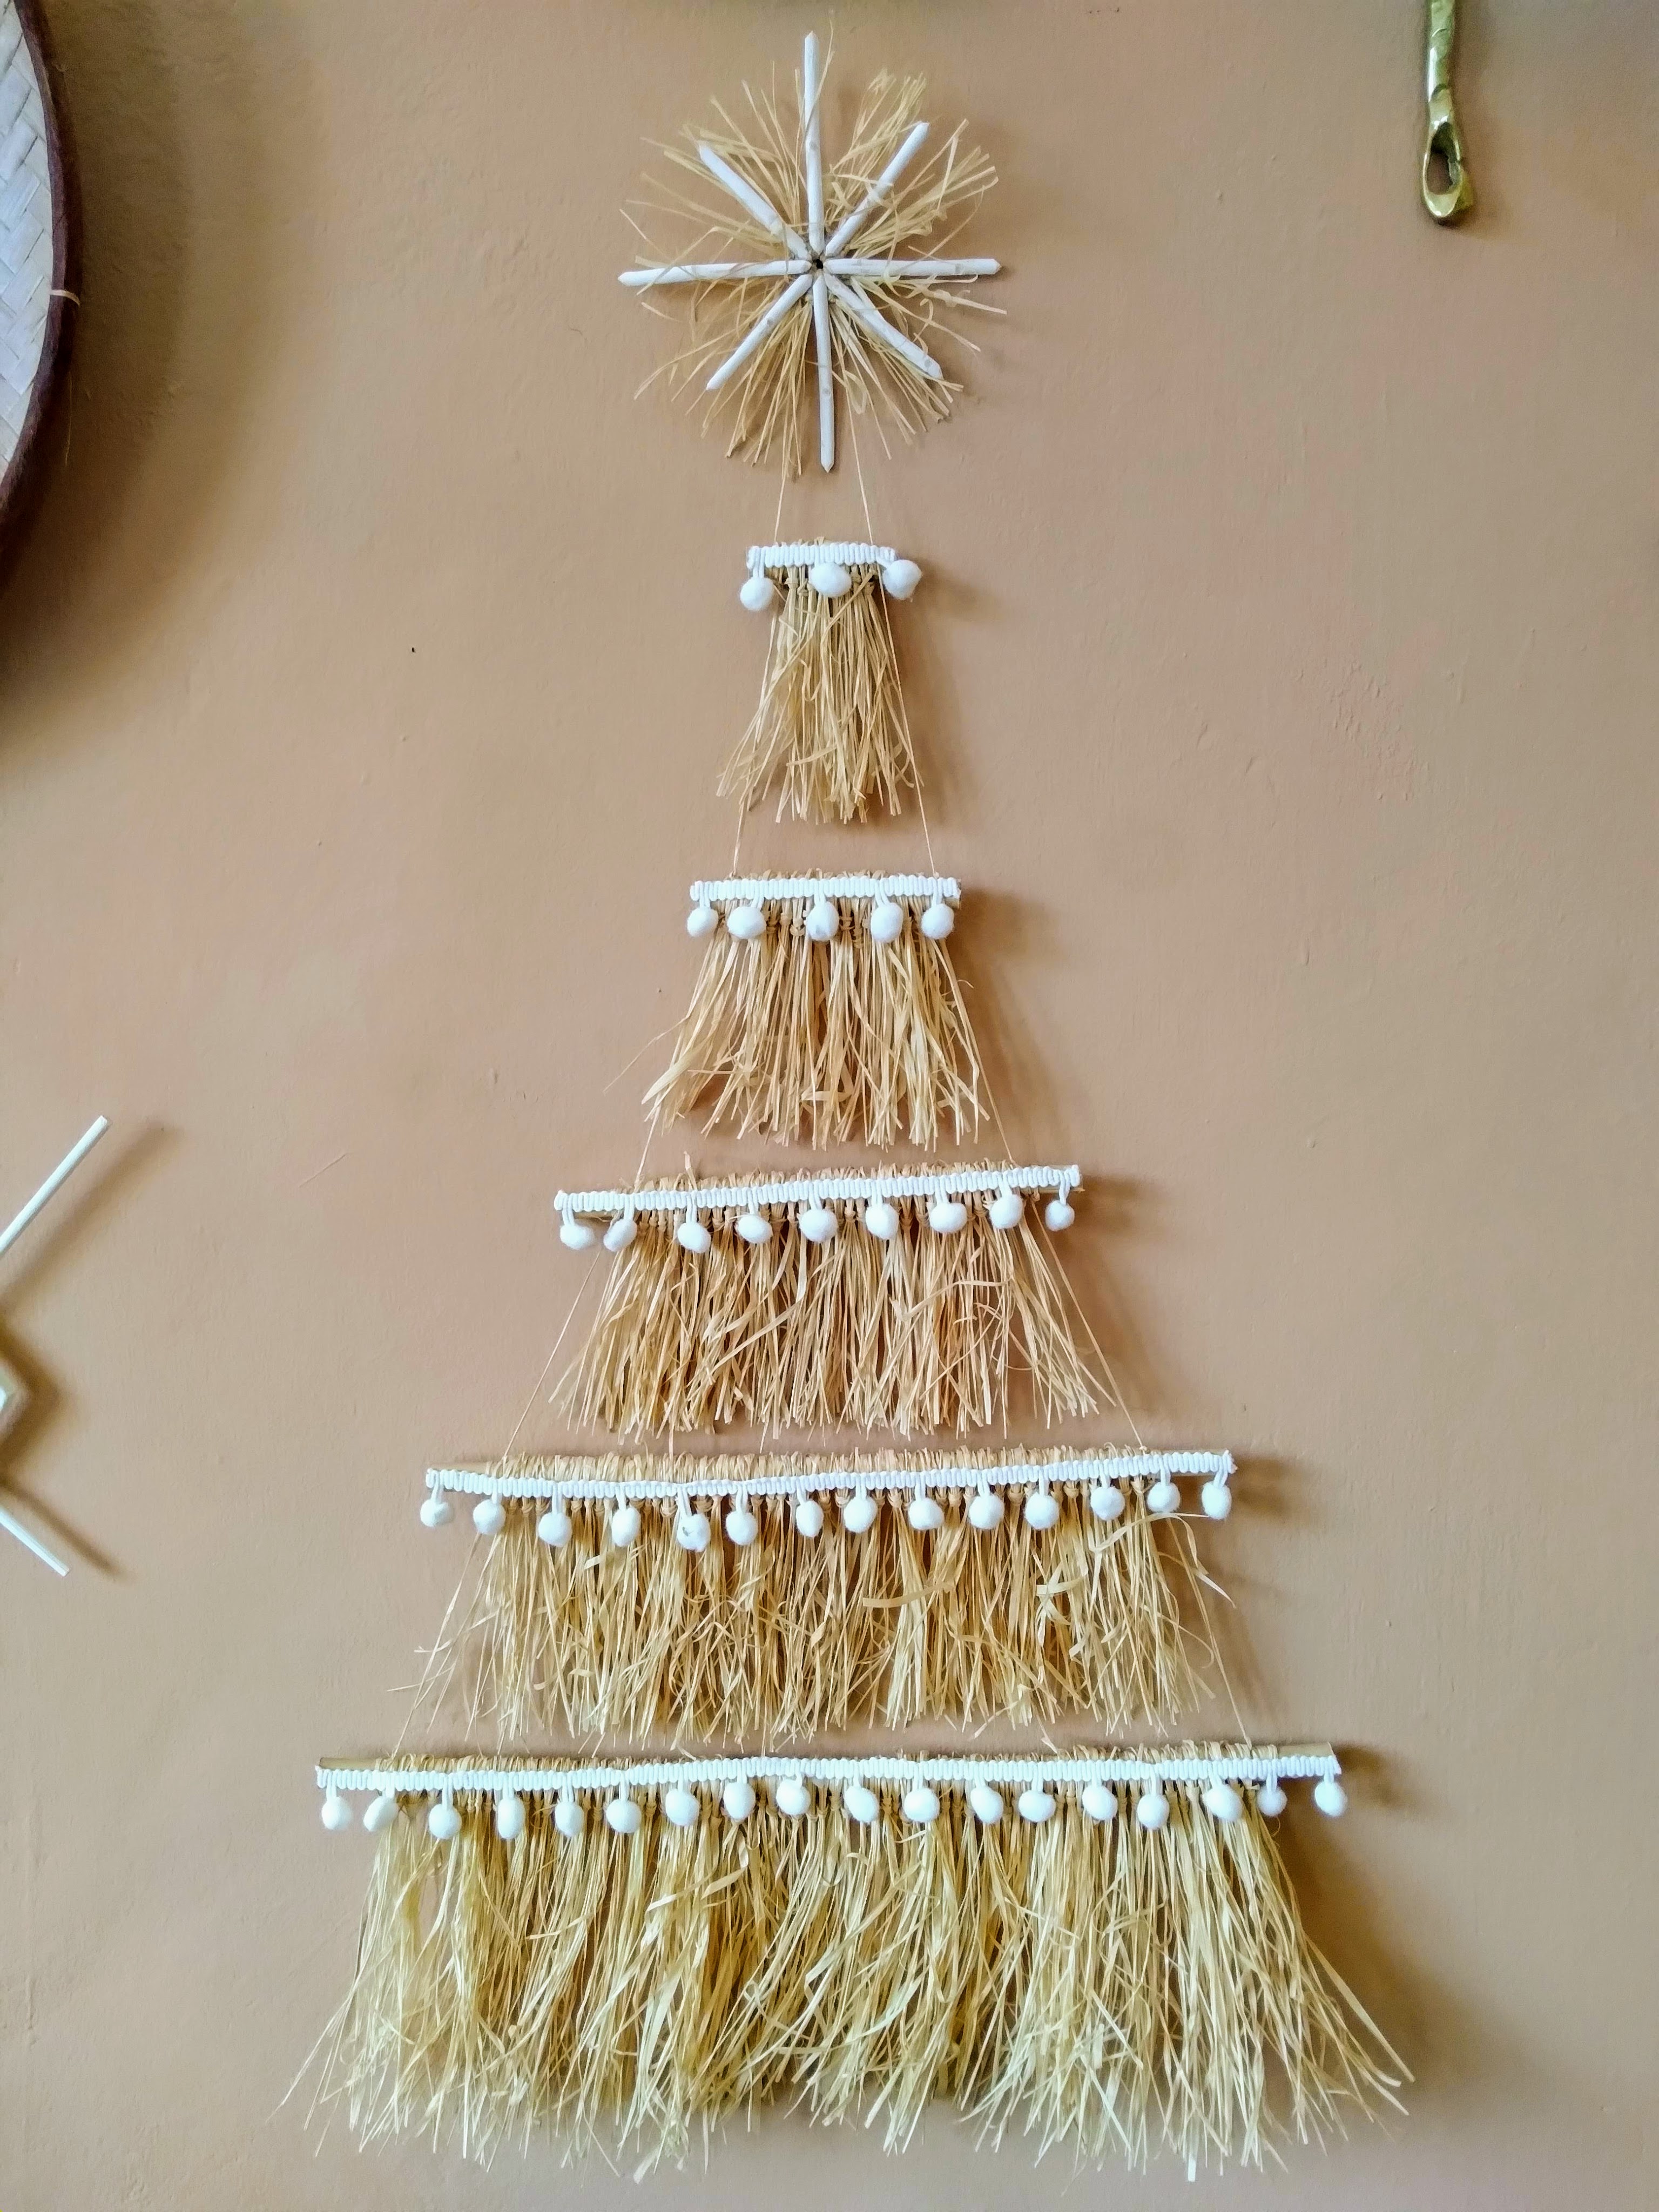
Christmas tree
I saw these two DIYs on Dossier Blog and decided to combine them to make myself a boho tree last Christmas.
I added white pompoms to the tree, and bits of white wicker to the star.
I liked it so much I briefly considered being like one of those Mauritian shops that leave their faded and dusty Christmas decorations in their window display for years on end.
When I was in the US a few years ago, I went to a Dollar Tree store (Americans, you are so lucky!), where I proceeded to fill what space was left in my suitcases after my art supply and food purchases, with all the things I didn’t know I wanted until I saw them priced at only a dollar each.
Including placemats that looked good to my greedy little eyes in the shop, but cheap and nasty in the bright Mauritian sun.
I added wooden beads and a swirl of raffia to the centre of this one:
and little air dry clay balls to this one:
ALTERNATIVE METHOD
If you don’t want to lose hours of your life tying bits of raffia to string, another option is to use hot glue to attach the raffia as shown in the second project in this video starting at 3.34.
You can use this method if you’re attaching the raffia to the back of something, or covering the glued ends with rope or a trim of some sort.
I have a few more projects lurking around, but I suspect you’re probably all raffia-ed out by now, so I’ll leave you with photos of another shop I once found in Port Louis when lost, although it’s one I hope never to see again.
It must be the most terrifying toy shop in existence – its window display looks like a post-apocalyptic Chucky movie!
I have no idea how long these dolls have been there, but they’ve put me off ever sitting in the sun again!
The boys should have borrowed Santa’s blackout glasses.
And watch out – this one’s coming for you – lucky they restrained him with that rope!
One of my favourite things about the resurgence of boho-style decor is the wide variety of wall hangings, ranging from macramé, to air dry clay wall “jewellery”, ones woven from yarn, and others made from raffia.
And I’ve had a go (or two!) at all of them…
MACRAMÉ
A lot of macramé wall hangings are a bit busy for my taste:
Etsy USD75
Etsy USD111
so I searched YouTube for simpler ones.
Buy it:
Night Crafts by Kasia Etsy USD37
Bliss Decorations Etsy USD18
Lots of Knots NL Etsy USD147
Or make it:
I made my own versions of these – the feathers were my first foray into the world of macrame since the seventies, so please don’t judge!
I had to make the last one up as I went along – I used the lark’s head knot to attach the twine to the stick, the double half hitch to form the curves both above and below the tassels, and rya knots to make the actual tassels. I made the beads from air dry clay. This looks the simplest, but was, in fact, the most fiddly and time-consuming to make.
AIR DRY CLAY
Heart
I couldn’t find anything similar online, so you can’t buy it unless you come to my garage sale and buy mine, which was inspired by the silver pendant:
I rolled the clay into a thin sausage shape, then formed the heart, squishing the clay to make it lumpy and uneven. Once it was dry, I painted it, wrapped parts with raffia, added some wooden beads and tied it to a wooden curtain ring, before hanging it with more raffia.
Wall Jewellery
This trend is obviously already on its way out, as I couldn’t find the original images I took inspiration from. Glad I didn’t spend all that money on them!
Buy it:
Etsy USD43
West Elm USD155
West Elm USD150
Or make it:
My only tips are to make your shapes a little larger than you want the end result to be, as air dry clay shrinks as it dries, and not to stress about making it perfect (much as I’d like it to be!), as the clay also warps slightly as it dries which means nothing will line up properly, and it’ll hang somewhat wonkily.
But hey – that just goes to show that it’s handmade, and didn’t come plopping out onto a conveyer belt in a Chinese factory.
Discs
A lot of ceramicists are making these at the moment (obviously from ceramics and not air dry clay, hence the high prices).
Buy it:
Heather Levine USD550
Michele Quan USD3580
Or make it:
There’s no video – so roll out your clay, use a cookie cutter or shot glass to cut out a million circles, make holes at the top and bottom, and allow them to dry for a couple of days.
I used 2 packets (1kg) of clay.
After you lightly sand them, you can leave them au naturel, or paint them, and then string them up.
I painted them with plaster of Paris mixed with paint, used thin jute to tie them together, and attached them to a header sewn from interfaced hessian (burlap).
I can’t remember why I decided to do that, but I’m glad I did.
WOVEN
Buy it:
Coral and Herb AUD80
Not on the Highstreet UKP575
Peas and Needles UKP45
Or make it:
How to make a loom:
I made mine when I was in Tasmania a couple of years ago – I wasn’t at all sure that I’d be any good at it, or if I’d enjoy weaving, so rather than spend a fortune on wool only to discover that I was not a natural-born weaver, I bought a load of second-hand wool, made a loom from a second-hand picture frame (the wooden bit under the canvas) and some nails, did an image search for weaving techniques, and tried the ones I liked the look of.
Then it was a case of trial and error, unravelling and starting sections again when things didn’t pan out as I’d imagined.
I became an expert unraveller!
It turned out to be more like a sampler than a piece of wall art, but I’m still happy with it.
I don’t care if wall hangings go out of fashion again – there will definitely be a spot (or five!) in my new house, reserved for whichever one next takes my fancy to make.
Whenever I write a DIY post, I spend a lot of time online searching for images and prices of the inspiration pieces.
Consequently, every time I go online now, I’m flooded with ads for high-end department stores, usually Anthropologie, Maison du Monde and suchlike.
But recently, (and I don’t know why, as I’d never heard of it before, let alone visited the site), Made in Design by Printempts has made itself well and truly known to me.
(FYI, French department store, Printempts, bought Made in Design which is “Europe’s leading e-commerce site for design furniture, modern lighting and designer decorations”, and together, they’ve come up with a range of truly (they say) unique (I say, bizarre!) designs)
Many of their products made me shake my head in puzzlement, and wish that I could have a teeny tiny peek inside their clients’ houses.
And being the wonderfully generous person that I am, I thought I’d share some of the odder ones with you.
You can thank me later.
I’ll be kind and ease you in gently with this €400 stool (which if you actually love it, I’m sure you can make with some downpipes and a can of Barbie-pink spray paint!)
But now, my friends, allow me to lead you on a magical journey through the land of animal decor…
…maybe a sweet 21cm long, €82 rat lamp for your bedside table?
You could even buy yourself a mini plague of them.
No? Maybe this well-groomed gorilla who will forever stare down at you is more your thing – €540
Now, everyone likes dogs, right? And, yes, from another angle, he’s definitely male.
Bench €437
Or maybe you’re in the market for a €2535 donkey desk…
And in case you can’t imagine sitting and working at a donkey, they’ve styled it for you to make it more familiar:
See? It’s a real desk!
If you’re into the satanic, this rampant ibex bookshelf for €1315 might be exactly what you’re looking for:
Yikes!!!!
And finally in this series, what I initially misread as being a bedside table lamp, and figured was enough to give you a fright every time you woke up and saw it…
…is even worse, as it’s the actual bedside table in the form of a €649 giant goose lamp!
Imagine that looming over you as you lay in bed!
Aargh!!!
OK, I think I’ve bored you for long enough with the animals.
So let’s move on to my favourite category…human body parts!
After all, who wouldn’t want this €59 trinket tray to pop your keys or jewellery in?
Or an abstract penis lamp for €480
Speaking of penises (I never imagined I’d be typing those words in a blog!), you can showcase one of these €62 sculptures on your shelf – maybe on the rampant ibex one.
(Click on the image for more detail)
What the actual #*%$*?????
And they’re big – all around 25cm tall!
In the words of a well-known Australian idiot, would someone “please explain”. Why would anyone want these?
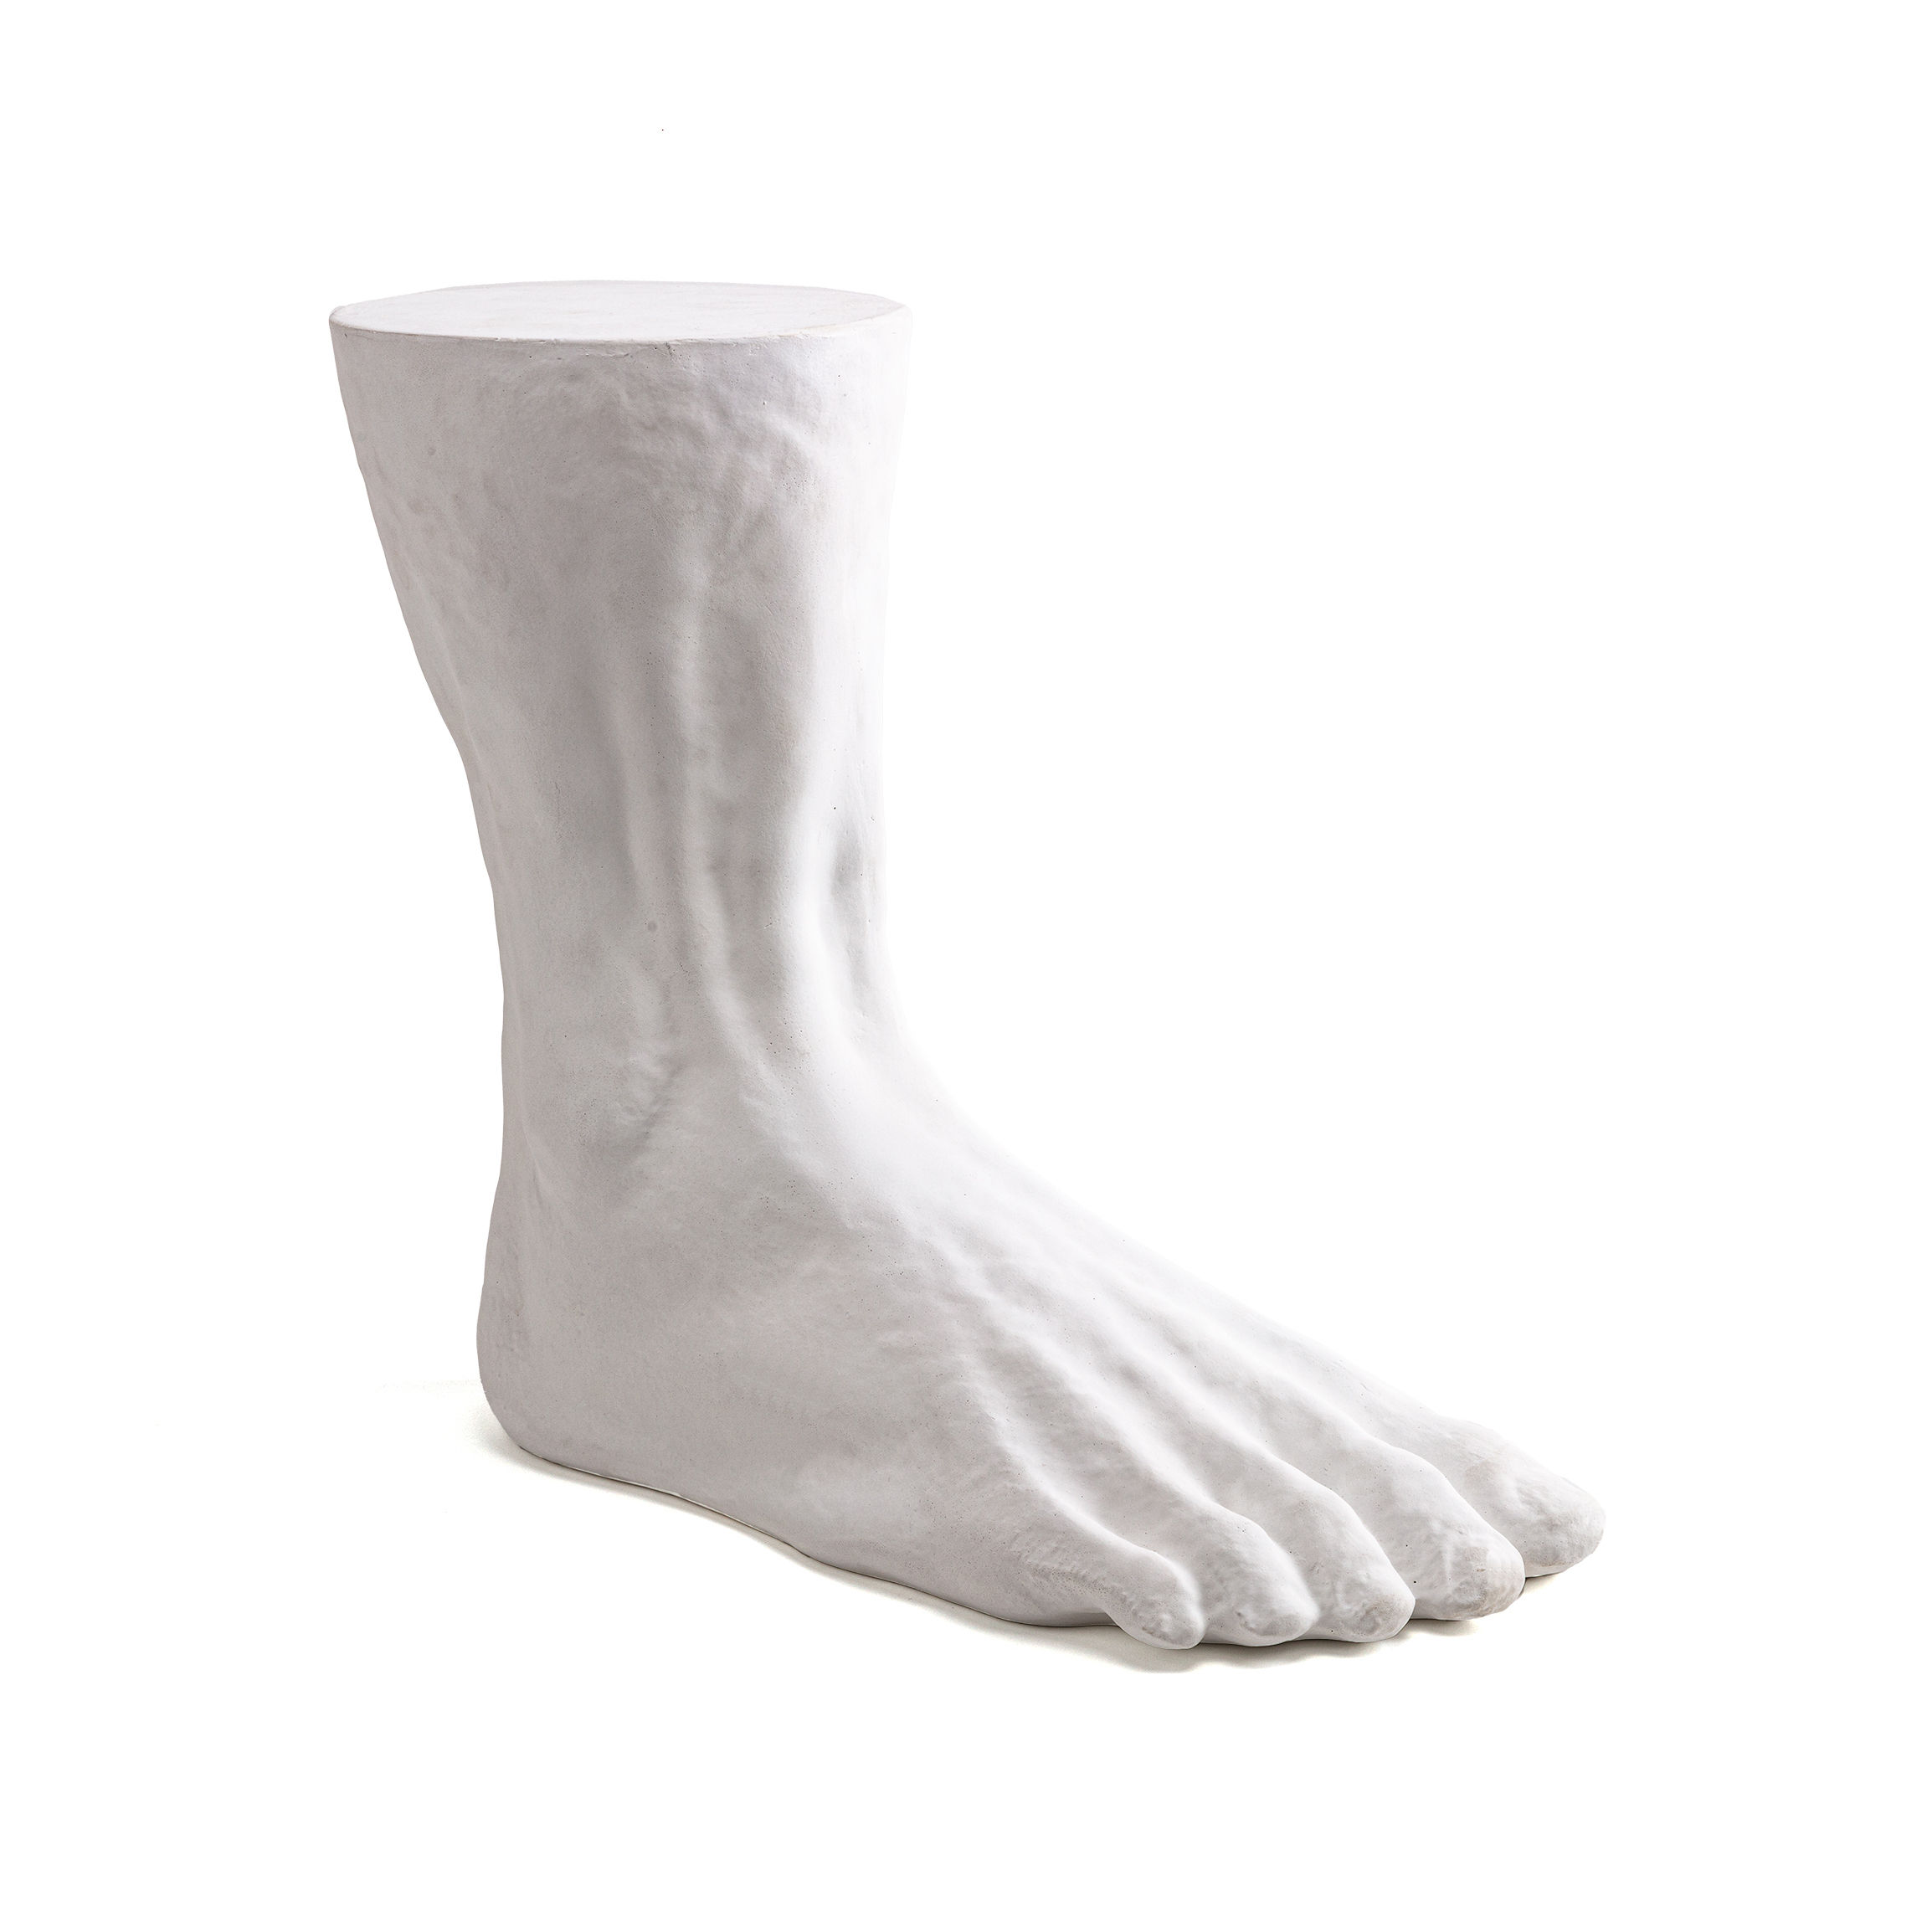
And finally (do I hear cries of relief?), a €190 side table which I can imagine beautifully-styled with the €79 vase…
I love how it comes complete with varicose veins and deformed toe, and as far as this heart vase goes, I have no words.
Maybe you’d prefer it in glass:
Or if all of those chopped off veins don’t appeal, this €177 vase might be a humorous take standing on the foot table???
You’d need a great sense of humour, and incredible style to make these pieces work in your space.
Or maybe, I just lack vision!
Something I never thought I’d be grateful for!
Anyway, now that this ordeal is over, all I have left to say is:
Over the past couple of years, I’ve made a few lampshades that I spotted online, and which even if I were prepared to pay the asking price, I couldn’t get here in Mauritius.
I’ll tell you upfront that they’re very time-consuming, and are best made whilst binge-watching TV shows you don’t have to give your full attention to, and sipping on a glass or two of wine.
I was going to recover my existing bedside lamps with fabric, but when I removed the old fabric, they fell apart, and the plastic that the fabric was glued to broke, as it had perished and become brittle with age.
I set them aside, until eventually, I found the Dossier Blog tutorial.
I de-rusted the frames and painted them, then cut the wooden dowels to size, and stained them with watered-down craft paint.
Emily at Dossier Blog used hot glue to attach them to the frames, but I found it easier to just tie them on tightly with raffia, and once I’d finished, I brushed the raffia with wood glue on the inside where it doesn’t show.
I couldn’t find cotton yarn in Mauritius, and had to use synthetic, so it doesn’t look nearly as good as I’d hoped, but for less than AUD20, I can’t really complain!
I attached the tassels to wooden embroidery hoops, and covered the top one with a length of deconstructed placemat as I didn’t like seeing all the knots.
To hang it, I nailed a strip of 1x1cm wood to the top hoop, added a small hook in the centre, then hung the whole thing from a chain suspended from the ceiling.
(I don’t know how I manage to take such crooked photos – the things on the wall look like they’re caught in a cyclone!)
JUTE AND TASSEL PENDANT
Buy it:
Anthropologie USD248
Or make it:
Video: Lone Fox – the relevant part starts at 12.25
As I didn’t have an existing shade to work with, I made a frame from embroidery hoops and lengths of half-round moulding hot-glued together.
Halfway through making the shade is when I discovered that Mauritian hot glue sticks are RUBBISH!!!!!
Definitely click on the third photo to get a close-up of what made me swear so violently that I terrified the cat!
In the end, I decided not to finish making this, as I’d have to leave it behind. Instead, I’ll take the 60+ tassels I lovingly made back to Australia with me, and make a pendant light for my new house.
I didn’t have an old shade to work with, so made my own frame again.
Having previously learned not to use hot glue(!), I used wood glue and small nails to attach the mouldings to the embroidery hoops, then spent many an evening winding and glueing the raffia around it.
I also added tassels, because…why not?
Like the others, this took forever, but was completely worth it – it’s fun and makes me smile whenever I look at it.
I bought the raffia in bulk from a shop in China Town somewhere, which makes the amount used for this project negligible (I got lost walking around the back streets of Port Louis one day, and accidentally found this dingy little shop that I guarantee I’ll never find again!), so really it’s just the cost of two embroidery hoops – under AUD10.
If you make any of these, ensure that you only use LED globes as they don’t emit heat, and consequently, won’t set your lampshade on fire and burn your house down.
I’d love to hear what you think of them, so let me know in the comments section below.
As you’re probably starting to realise after reading these posts, I tend to get fixated on a technique or material, make a bunch of DIYs, and then, because I have a low boredom threshold, move on to the next shiny thing that’s caught my eye.
One of these materials is air dry clay.
At around rs120 (AUD5) a packet, you can make all of these items for a fraction of their purchase price (if you ignore the amount of time spent working on them!).
As usual, click on an image to enlarge it.
Bead Garlands
Buy them:
Harper and Wilde AUD165
Marlowe Hues AUD39
Sun Republic AUD85
Or make them:
I went a bit mad with these.
I found a wood and jute curtain tie-back at Mr Bricolage and used it as an oversize tassel
then I made a bunch of small ones to hang on my door handles
Raffia tassel
Jute tassel
and a long one to add to my gallery wall.
Video
Ashlee White – no, there’s nothing wrong with the volume on your computer – she just likes to whisper-speak for some reason. We can’t hear you, Ashlee!!!!!
My Tips
If you’d like evenly-sized beads, weigh the clay out on a digital kitchen scale – 12g makes for a good-sized bead once it’s dry.
Air dry clay shrinks as it dries, so make sure the holes you make for stringing are larger than you think you’ll need. If they shrink too much, use a small drill bit (minus the drill) to carve them out. Or do as Ashley did and dry them on the skewers. Wish I’d thought of that.
Incense Holder
Buy it:
Muddy Heart USD66
Rosie Rosie Goods USD65 and not good for my OCD – wonky fingers and crooked lines!
Free Dreamers CAD29
Video:
By Crafty Crafts
I first made a small one, but though it was cute, it was not fit for purpose – it was too small to catch the ash, and I kept ending up with a mess.
So I traced around my hand, then ruled straight lines to get rid of the old-person lumpy knuckles (not a good look – either on the incense holder or on my fingers!).
I copied the markings from the Muddy Heart ones, thinking they had a spiritual meaning, but now I suspect that they were just the artist’s design. Next time, I’ll carve my own patterns and make it a bit more interesting.
Once dry, I lightly sanded the edges, then painted it with an acrylic and talc mixture for a smooth, but matte, finish, and when that was dry, I used a paint pen to highlight the carvings.
It still doesn’t catch the ash, but looks pretty, so it can stay.
So far, air dry clay has been my favourite material to work with – it’s very versatile and easy to use – anything you see made from traditional ceramic, you can make with air dry clay.
There are a couple more projects to show you, as well as a few more things I’d like to make, but those can wait until I buy my Tasmanian house.
I’ve had a couple of people ask me what following a blog involves, and what it means for their privacy.
I can only speak for this blog – if you enter your email address and click Follow, I’ll receive an email advising that your email address is now following my blog.
And that’s it – I’ll never know whether you’ve read any posts or paid my blog the slightest bit of attention after that initial view.
The only information I receive is a daily summary of how many people from each country have visited, and how many, and which, pages were looked at.
You’ll receive an email each time I publish a new post, which you can then choose to read or not.
It’s totally secure – I won’t be able to hack into your bank account and run off with all your money, nor am I going to turn up in the middle of the night to claim possession of your firstborn.
So if you’d like to be notified of new posts, simply enter your email and Follow my blog.
And now on to the meat of this post…
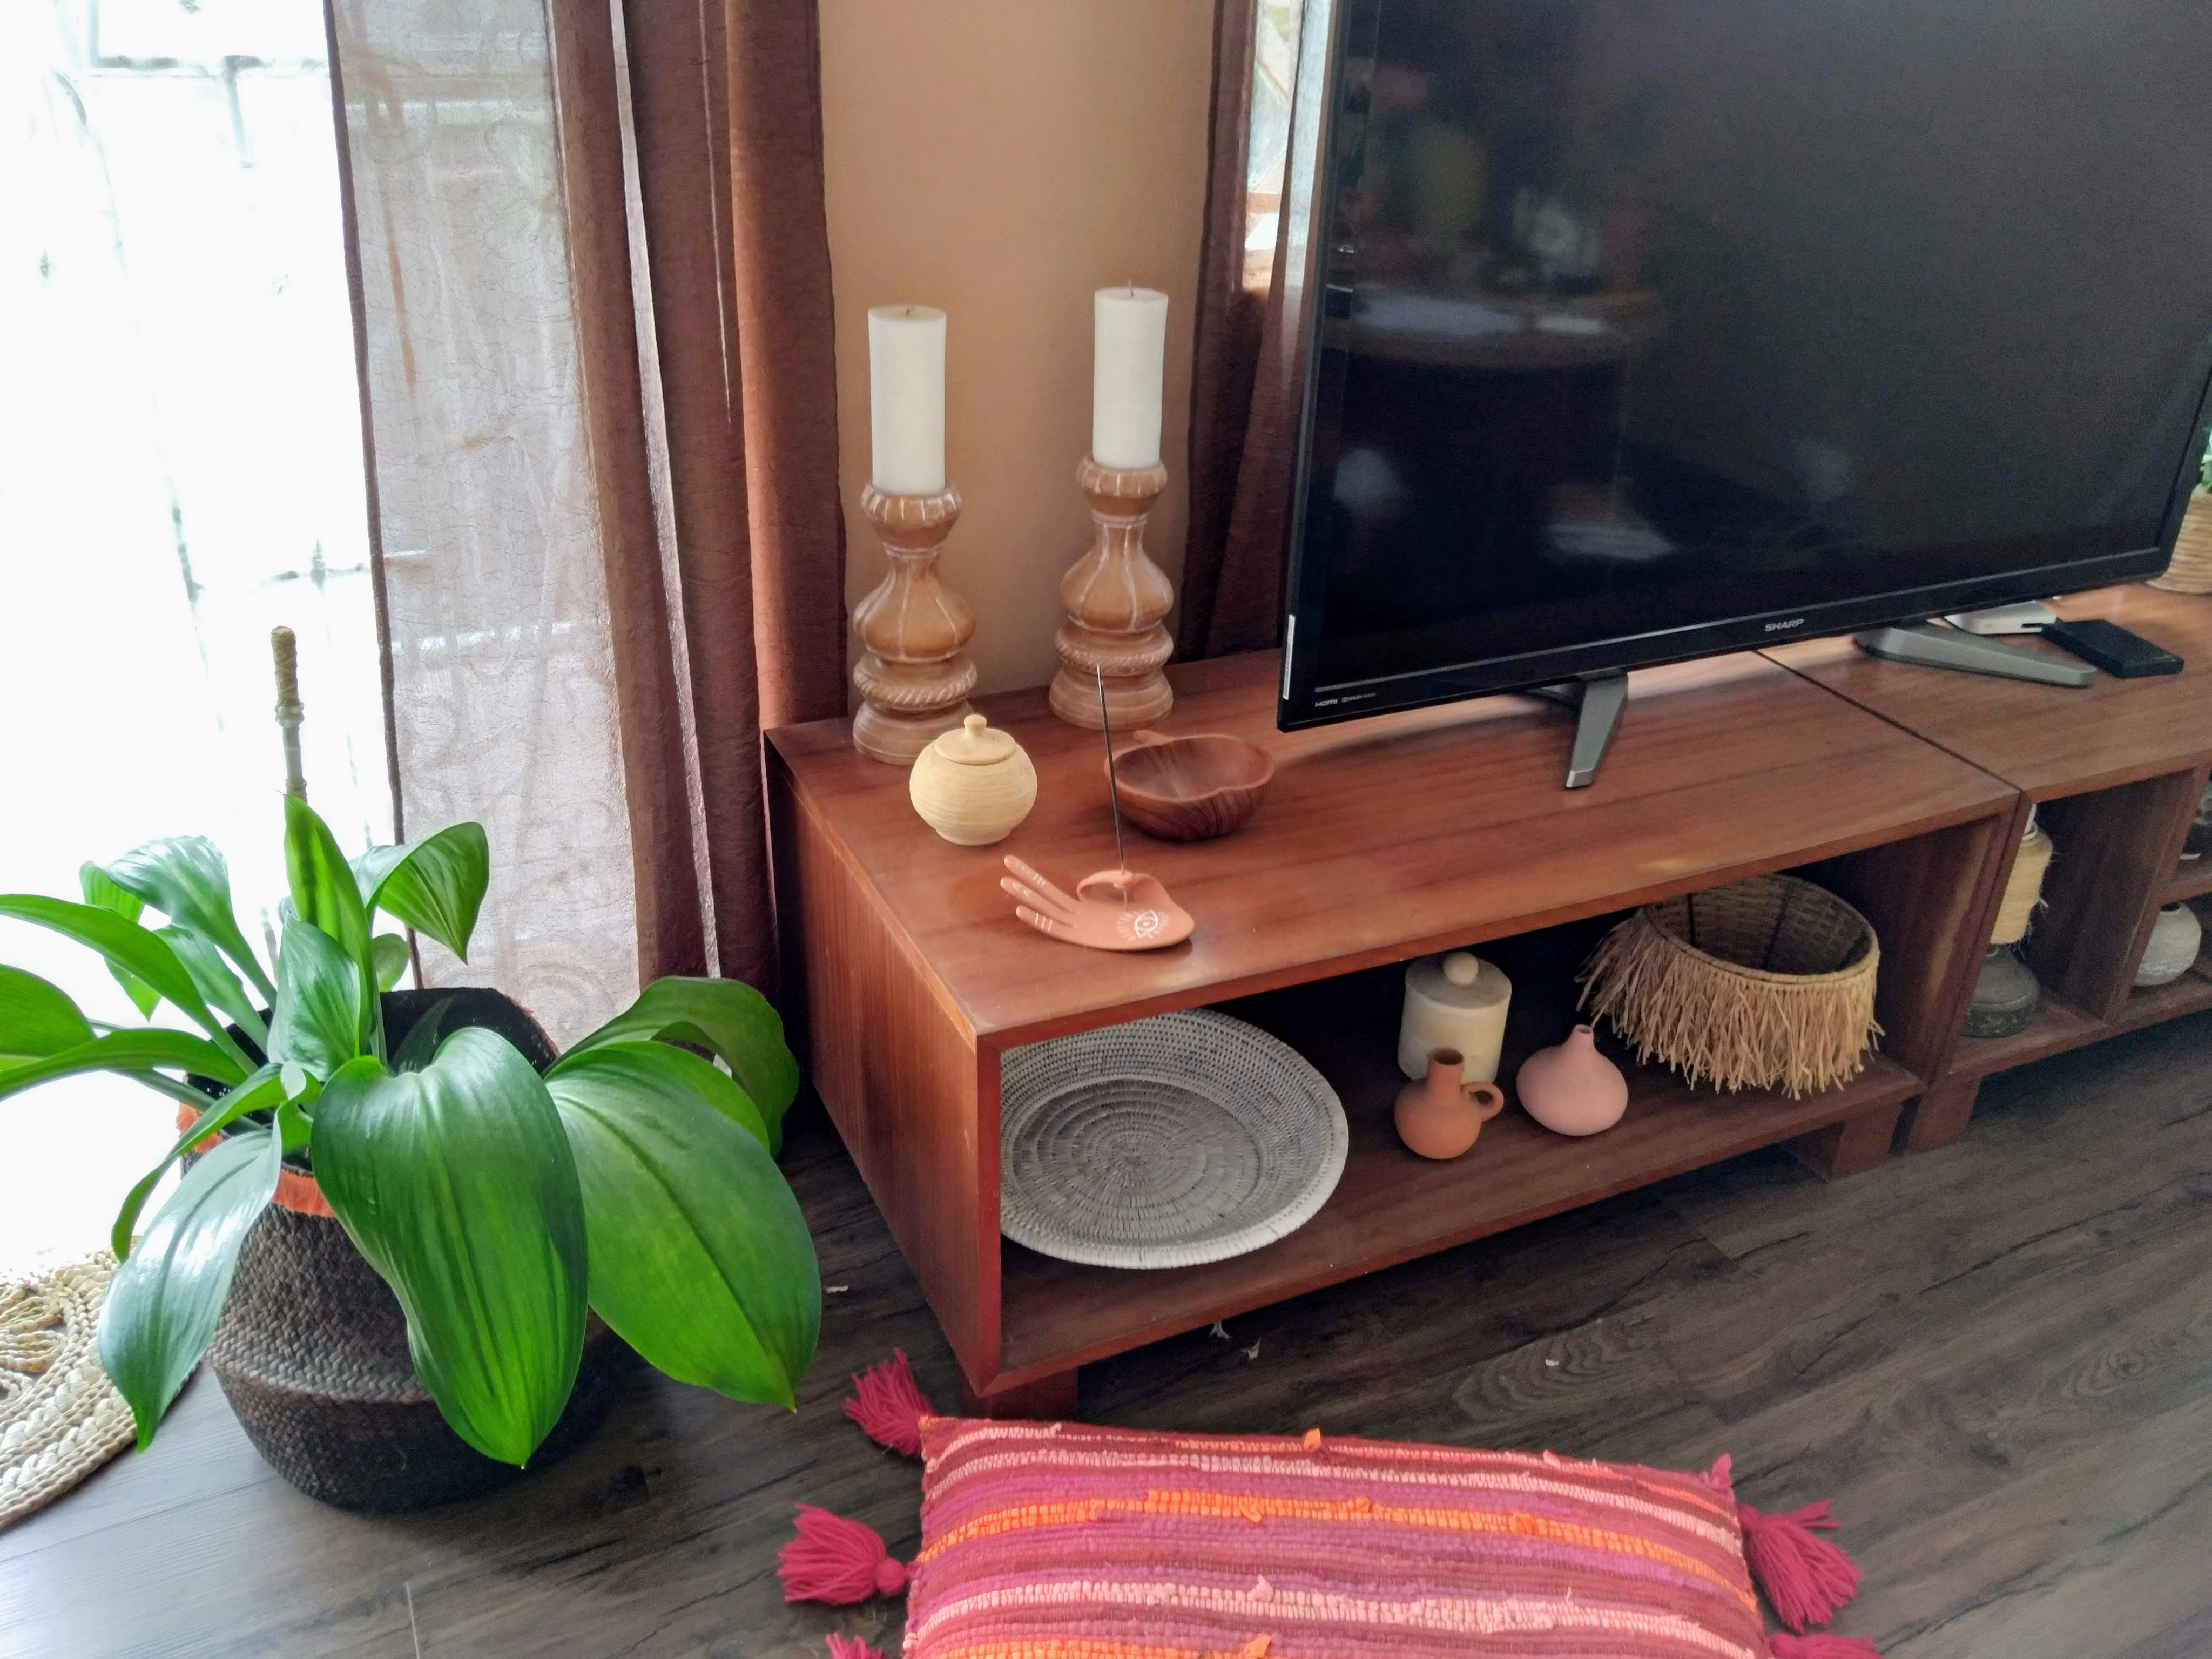
…stuff on sticks are everywhere, and since making the hamsa, I’ve made a few more sculptures based on stone and wooden “objets” that I’ve seen online.
They’re quite substantial, and you’d never guess they were made from cardboard.
I used the techniques shown in the hamsa and fish videos.
As usual, click on an image to enlarge it.
Round “Objet”
Buy it:
!st Dibs – Sumba stone USD4400
Restoration Hardware – stone disc starting at USD285
Or make it:
I made the form with 5 layers of cardboard glued and taped together.
I mixed powdered crack filler (polyfilla/spackle) with acrylic house paint instead of water, and roughly applied it with a palette knife, creating a stone-like texture. I then rubbed different colours of acrylic paint over it with my fingers.
Then I decided it was too orange, and also that it I wanted to add a bit more interest:
I’m not a fan of the sand and stones I glued on, and prefer the original colours, but can’t remember how I mixed them.
One day I’ll learn when to leave well enough alone.
And maybe also to ignore that uncontrollable urge I get to touch paint to check if it’s dry, even when I can see that it’s not.
I have the tendencies of a 5-year old – I think my inner child is well and truly in charge of my creative side.
Tribal Head
Buy it for anywhere between USD265 and USD625:,
Or make it:
I was having a forgetful day – I forgot that I was blogging again, so forgot to take any more photos after the first one, and annoyingly, forgot that I was supposed to add paint, and mixed the crack filler with water instead.
The cardboard absorbed the water, became soggy, and warped as it dried out, and ironically, the crack filler cracked, and bits fell off.
Once it was completely dry, I filled the cracks and holes with wood filler, and painted it with white acrylic paint mixed with plaster of Paris to add texture and heft.
Then I decided to add some colour as it looked creepy and weird, so I rubbed a few shades of light brown over it.
It still looks creepy and weird, but no longer glows in the dark and scares the cat.
Fish on sticks
And no, I’m not referring to a 1960s hors d’oeuvre.
(Though that reminds me that I’ve yet to invite friends over to sample some toothpick food from this vintage purchase I made last time I was in Tasmania:
Olive or lump of cheese anyone?
Haha – I laugh every time I look at it!)
Anyway – fish on sticks – buy it by sculptor Juan Pozo Gomez – I couldn’t find a price, but his works sell for a couple of hundred euros:
Or make it:
After the final sanding, I created a copper patina on the fish using Modern Masters Metallic Effects paint.
Yep, that’s my fingerprint messing up the patina at the base of the fish!
I glued pebbles to the cardboard base, painted it white, then added the copper patina effect to the tops of the pebbles.
Wood on Teeny Tiny Sticks
No, I haven’t lost my mind – I’m not going to make this, I just need to share.
For a mere USD650 (!!!), this “Coastal Hand-Carved Panel Sculpture in teak and marble” can be yours from Wayfair:
I don’t now about you, but to me it looks like an old termite-ravaged fence paling!
I’d be too scared to have it in my house in case all my furniture got infested and devoured!
Who would buy this???
Anyway, back to my “Objets in Cardboard and Crack Filler” – they don’t suit the rest of my decor, but they were fun to make, and I got a tiny bit addicted to the technique.
But don’t panic – I’m over it now, so no more stuff on sticks – I’ll find something else to bore you with next Sunday!
I like to collect objects from different religions, and display them as part of my decor. I don’t actively go searching, I just keep an eye out.
Buddhism is obviously the easiest, as there’s a lot of choice, and a lot of lovely things are already designed as home decor.
My favourites remain the Thai Buddhist amulets that Alf and I bought wandering through the amulet markets each time we visited Bangkok:
(Click to enlarge)
We bought this Greek Orthodox cross when we were in Athens many years ago:
Pre-falling of the wall
Now
So sad – the leather thong rotted in the Mauritian humidity and snapped, and the beautiful slumped-glass cross shattered when it hit the tiled floor.
I might get another one made once I’m back in Australia, though it won’t be the same unless I can find a glass artist who is also an Orthodox monk!
I wanted to buy an Orthodox icon when I was in Corfu a few years ago, but didn’t find one that really called to me, then I spotted this stunner of a painting in an art gallery:
It was massive (with a matching price tag!), and much too big for my space (and wallet), so I settled for a baby version instead:
Hinduism probably has even more objects than Buddhism, though not generally to my taste.
Alf found this copper Ganesh when we first moved to Mauritius:
and my aunt bought me this little Hindu praying hand many, many years ago when we were all here on holiday together:
But despite being Catholic (by birth at least), I’ve yet to find an object I like – do not suggest one of those holographic portraits of Jesus with eyes that follow you around the room!
And the same goes for Islamic and Jewish objects.
Then a couple of weeks ago, I found this gorgeous glass menorah online:
But the site only ships within North America, and the artist, Alicia Kelemen, doesn’t sell directly to the public.
Boohoo.
I also recently saw a beautiful carved wooden platter in the form of a Hand of Fatima – a Turkish and Middle Eastern Islamic symbol – and strangely, also Jewish (Hand of Miriam), and Christian (Hand of Mary).
I did some research.
When facing down, it brings goodness, luck, fertility and abundance into your life. When the hand is upright, it’s a powerful symbol of protection against the evil eye and negative energy.
It’s also called a hamsa.
For Hindus and Buddhists, the hamsa represents the chakras, the five senses and their associated mudras (hand gestures) that re-direct energy flow throughout the body.
Anyway, instead of immediately ordering the platter, or even bookmarking it, I moved on, and pandered to my morning addiction to online window-shopping.
Much later when I remembered about it, I couldn’t find it again.
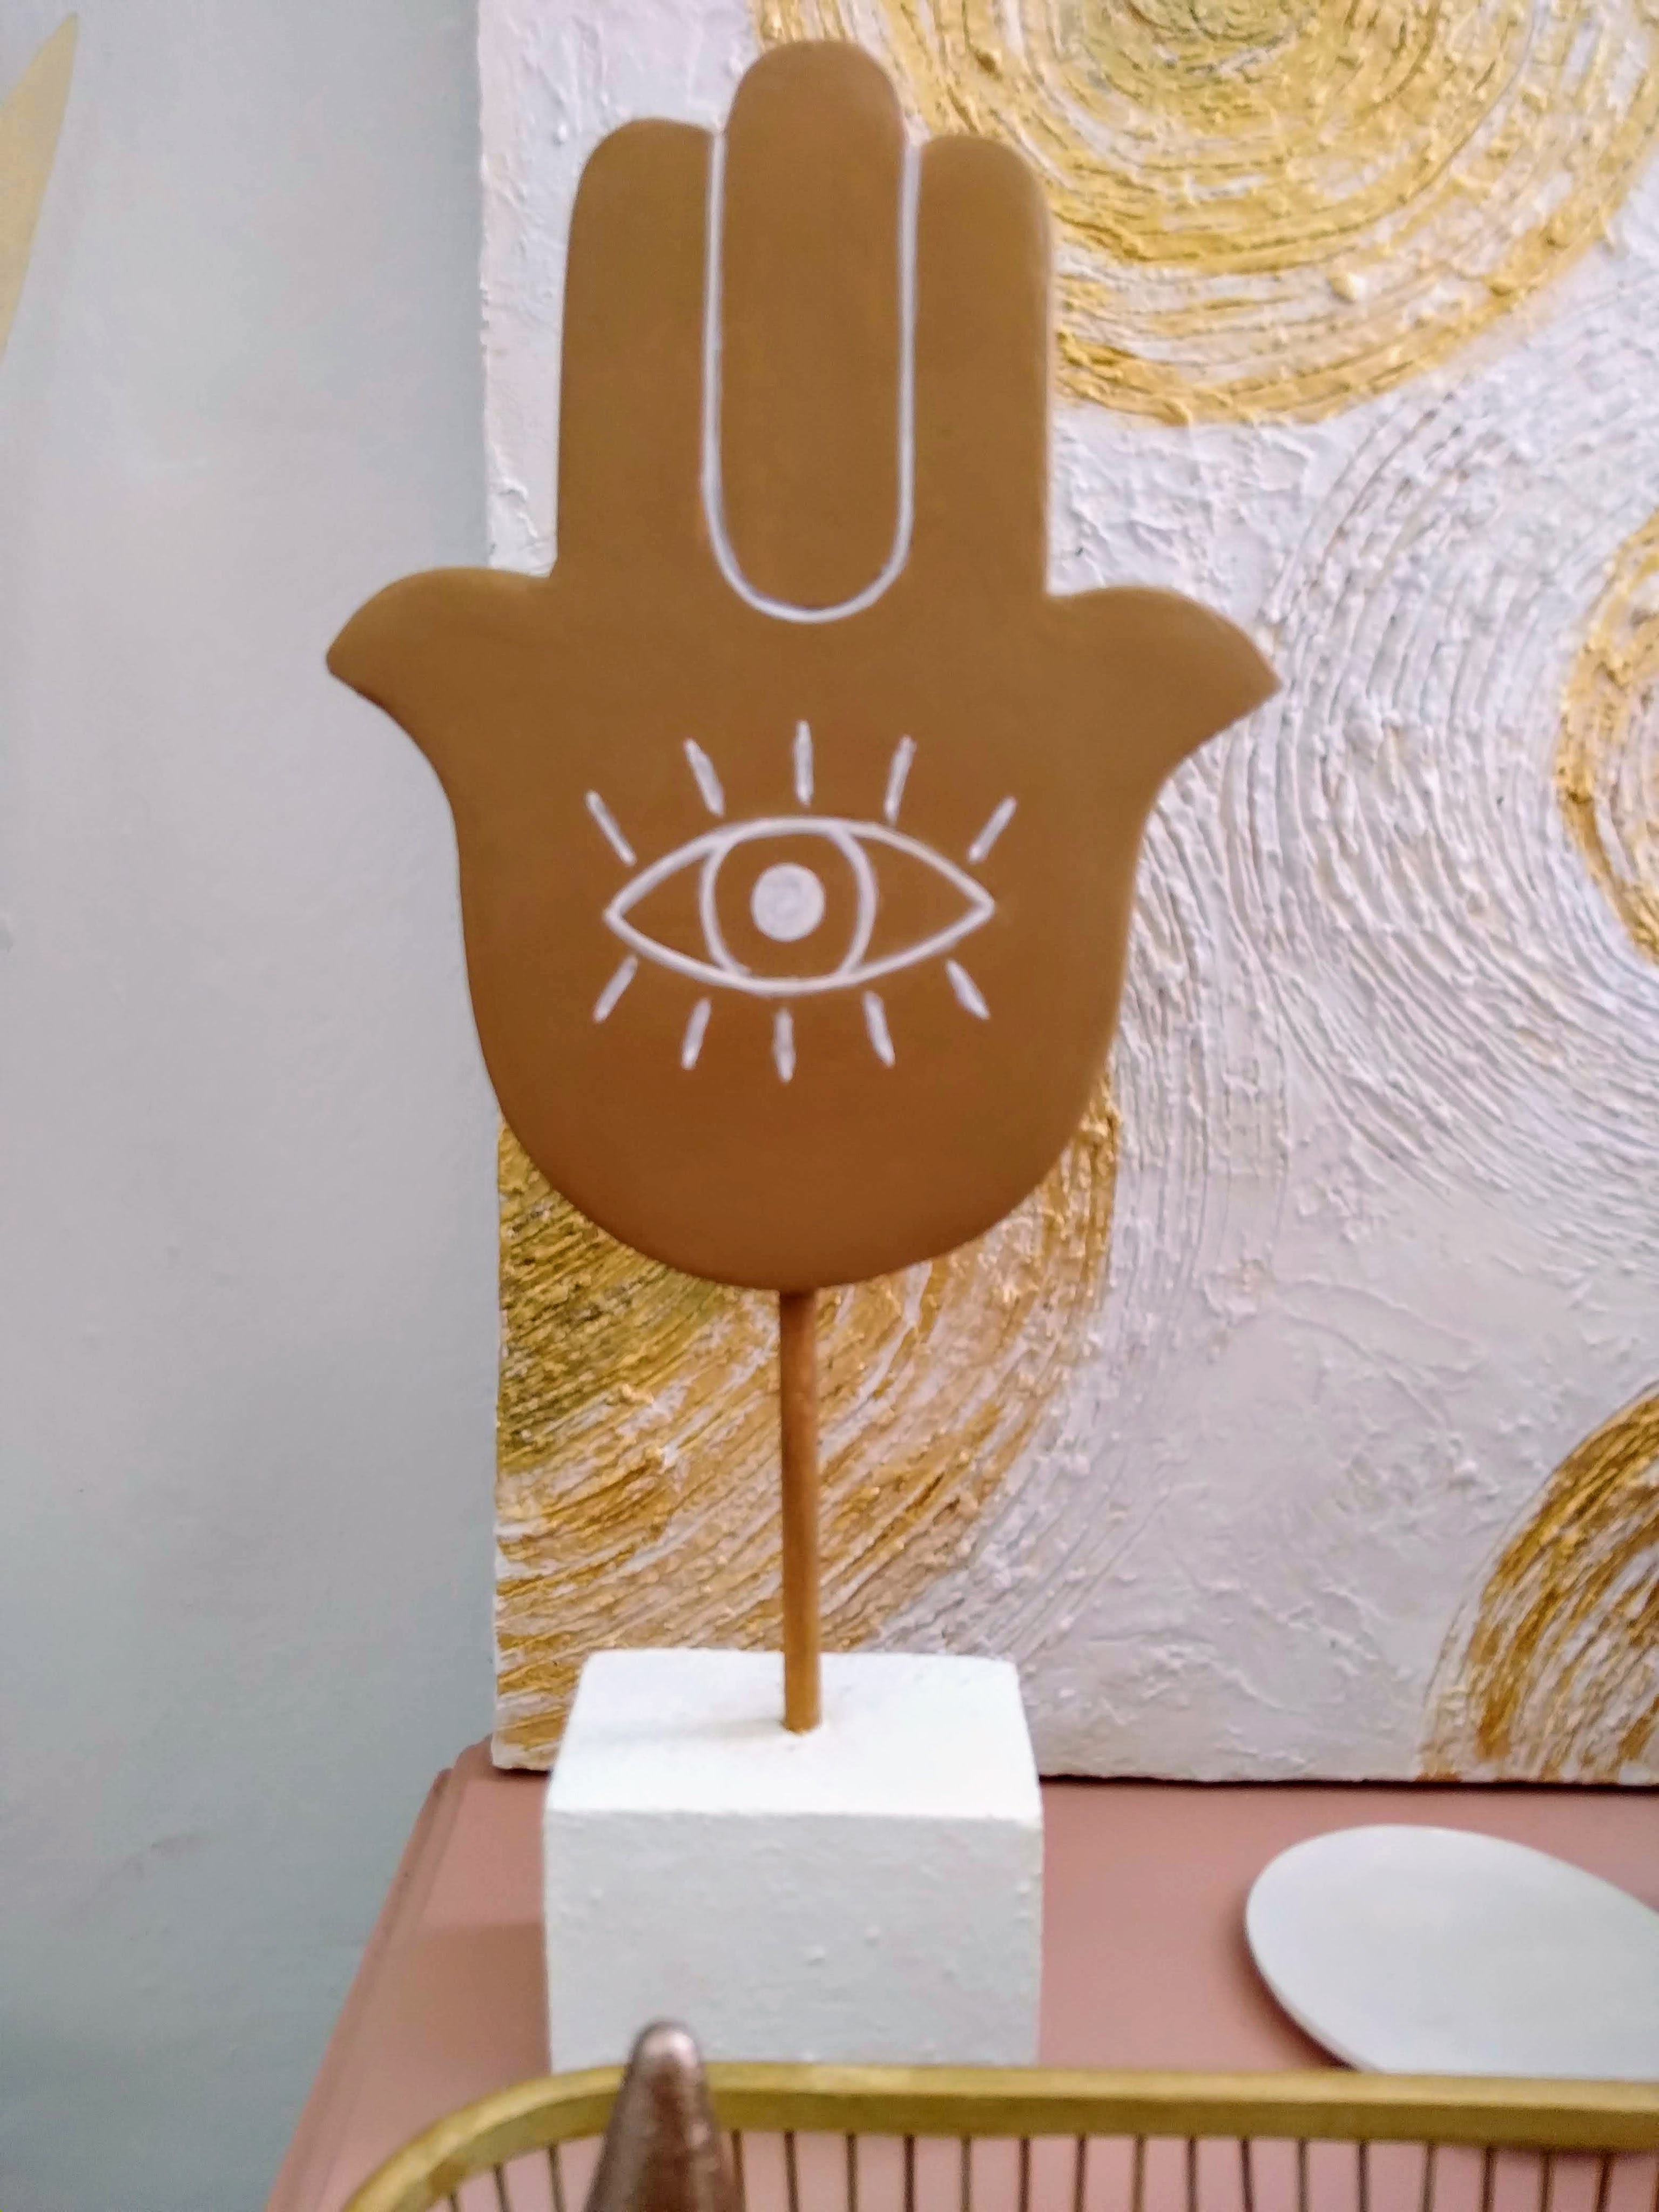
So I decided to make a version of my own.
Supplies
Cardboard
White glue
Wood filler
Sandpaper
Thin wooden dowel
Wooden block or other base
Acrylic paint
Reference Videos
Family Handmade – she’s very skilled with a paintbrush!
Valeri R – she has printable templates below the video on YouTube:
My Method
Grab your cardboard, and trace around your template – you’ll want either three or five layers, depending on the thickness of the cardboard – I used five.
Cut them out as carefully as you can – the more precise it is now, the less work you’ll have later.
If you prefer a more organic and rustic style, be as slapdash as you like.
Each to their own.
Personally, I prefer my handmade items to look as though they were made by me, as opposed to a 5 year-old who’s dying to finish his detention in arts and craft class, and go kick the hell out of a football.
But that’s just me.
And I’m showing my age.
Probably detention no longer exists because it’s psychologically harmful, boys are no longer referred to as “he”, and arts and crafts are banned as they’re sexist, racist, or some other “-ist”.
The world has gone to hell!
But that’s a rant I’d better not get into here…
…back to your five bits of cardboard…
…on three of them, mark the width of the dowel at the base of the shape, and cut out a slot.
Glue them all together, placing the ones with the slots in the middle. This is where your dowel will go.
Once the glue has dried, using a palette knife or small putty knife, apply a thin layer of wood or crack filler to the edges of the cardboard, filling in the corrugation.
Do the same to the flat surfaces.
Let it dry, and repeat.
Repeat as many times as you want, sanding lightly between coats, until you’re happy with the finish. Smooth or lumpy – whatever you like – see above.
Paint or varnish the dowel if desired.
Squeeze some glue onto the gap, insert the dowel, and let it dry.
You can now decorate it however you like.
I like to draw the design on very lightly with a pencil, or with chalk, so that it can easily be wiped off if I make a mistake.
You can either hand paint the designs, try the rolled paper technique from the video, or use a paint pen or a tube of dimensional fabric paint.
I went for simple lines, so drew my design, and used a pointy tool to lightly carve it out.
I then gave it a couple of coats of paint, and used a white paint pen to highlight the lines.
Drill a hole into whatever you’re using as a base, squeeze in some glue, insert the dowel, and you’re done!
You don’t have to make a hamsa – you can choose any shape you like, and follow the same technique.
Anyway, to conclude this rather epic post, while I won’t stop looking for Catholic, Jewish, and Islamic objects, my cardboard hamsa will definitely cover all religious bases till I find ones that I like!
I bought some black silicon coasters, and decided to paint them white, and attach a raffia fringe.
The addition of the fringe would have made them HUGE, so I cut them down before painting.
However, because they were silicon, paint refused to stick to them, and just peeled off.
Then I discovered that glue also wouldn’t stick to them.
And because I’d cut them, they were now too small and no longer useful, and I had to throw them away.
Mmmm.
On top of that, I was left with a bunch of raffia fringes I’d spent many an evening making while watching TV and patting the cat.
(Sad life, I know.)
So I put them aside for a few months, until YouTube once again came to the rescue.
RAFFIA ART
Supplies
A canvas
Acrylic paint
Baking powder or bicarbonate of soda, optional
Raffia
String
Hot glue
A lot of patience
Reference Video
DIY Dalia – the relevant part starts at 3.00
Bonus: she also shows how to make raffia fringing. I recommend attaching the raffia to a length of string instead of to a skinny bit of raffia as she does.
My Tips
The video uses a large quantity of acrylic paint to create texture on the canvas, but I used a thick paint/baking powder mix.
At the time I made these, I’d been working with air dry clay, so decided to incorporate some clay shapes into the artwork.
I rolled it out, cut out random shapes, and once they were dry, hot-glued them onto the finished painting before adding the raffia fringing.
A few weeks later on Pinterest, I saw work by artist, Elan Byrd, who obviously came up with this idea.
USD950
USD650
I thank her for inspiring DIY Dalia, and saving my raffia fringing from the abyss where my failed DIY projects go to die.
Mine (click on the image to enlarge it):
TEXTURED CANVAS
Some examples from Anthropologie (click to enlarge):
USD550
USD525
USD550
Art by Lana B – no price given
Supplies
I used wood filler because that’s what I had, but you can use polyfilla (crack filler, spackle), plaster of Paris, or paintable silicon sealant (caulking)
Each of these videos shows a different style of artwork.
Myriâme – she uses Plaster of Paris, and also shows you how to make a very simple floating frame:
DIY Dalia – she uses silicone sealant and a plastic fork:
Simply By A – she uses wall skimming plaster, and talks a lot:
Fia Garcia DIY – the relevant part starts at 4.34 – she also shows you how to make a slightly more complicated floating frame:
My Tips
This was almost another DIY disaster, due to my being stingy and needing to use up the last of my old tub of wood filler instead of opening a new one.
It was a bit dry and lumpy as I applied it to the canvas, but I soldiered on, and by the time I was ready to make some lovely swirls, it had pretty well dried in the heat, and I made a mess instead.
I painted it with baking powder paint in a desperate attempt to stop bits from continually dropping off, then left it to sit facing the wall in a corner of my patio for a few months.
I recently added gold foil (gold leaf’s cheap relative) and gold paint, and now, while I don’t love it, I no longer hate it, and it fits in with the other artwork I made to style my bedroom.
I don’t now why I titled this section “My Tips”, as it didn’t contain any and was more of a what-not-to-do.
Anyhoo, I’ll leave you with the moral of this near miss – stinginess is not an attractive trait, and will always come back to bite you on the proverbial!


